Changing the sand in the filter is one of the most essential elements of regular maintenance. It contributes to making your water clear and clean enough to be attractive. Various kinds of debris, oils, and even algae have been building up for an extended period in the sand inside a filter tank. They might then make the water cloudy because the efficiency of the filter itself will go down noticeably.
Table of Contents
Introduction
While changing the filter sand may seem daunting, it can be simplified with the proper guidance. This article will comprehensively walk you through each step, empowering you to understand and perform the process effectively. Additionally, we’ll discuss using pool filter balls as an alternative filtration medium, providing you with valuable information to make informed choices about your pool maintenance.
Understanding Pool Sand Filters
Pool sand filters use layers of graded sand, which are supposed to carry out an essential function in filtering out impurities that might contaminate your pool water. The process works in a particular way: once water enters the filter tank, it begins flowing downward through several layers of sand, each with a different level of coarseness to aid in filtration. During the process, it traps dirt, oils, and small particles in the water, only allowing clean and filtered water to return to your pool. It also includes a multiport valve, which is helpful during maintenance procedures; you can easily reverse-wash the sand after periods so that it flushes out any debris that may have amassed over time, ensuring optimal performance.
You Might Know…
The size of the sand granules is significant for effective filtration. If the sand grains are too large, they lead to poor filtration of small particles, leaving the water murky. On the other hand, very minute sand grains tend to clog up very fast, leading to a severe loss of the flow rate and overall efficiency of your filtration system.
Pool sand filters often use special media on the sand to enhance their filtering capability. These materials, such as chemical flocculants or diatomaceous earth powder, help bind small particles together, enabling the sand to filter those particles more effectively. For instance, diatomaceous earth powder is a natural filtering media mined from fossilized plankton remains. It coats the sand grains, allowing for finer and more effective filtration.
How to Know Why and When to Change the Sand in Your Pool Filter
The sand in your pool filter, designed to have sharp edges, would typically last 3-5 years if the proper maintenance was performed. However, these sharp edges wear off over time, reducing the sand’s efficiency in catching debris. The sand could also become saturated with oils, calcium, and dirt, reducing the filter’s efficiency. This is why it’s essential to change the sand when these signs of wear and tear appear.
You will be able to recognize that it is time to make a change to your filter sand when the following indicators appear:
- You notice cloudy water in the swimming pool despite your frequent maintenance.
- The speed of the current is much slower.
- The filter must be frequently backwashed.
- You begin to see debris escaping back into the pool.
Since the sand was never changed, this will only lead to increased chemical use, algae blooms, and an imbalanced pool environment.
Detailed Steps on How to Successfully Change Sand in a Pool Filter
These are the steps to follow in changing sand in your pool sand filter:
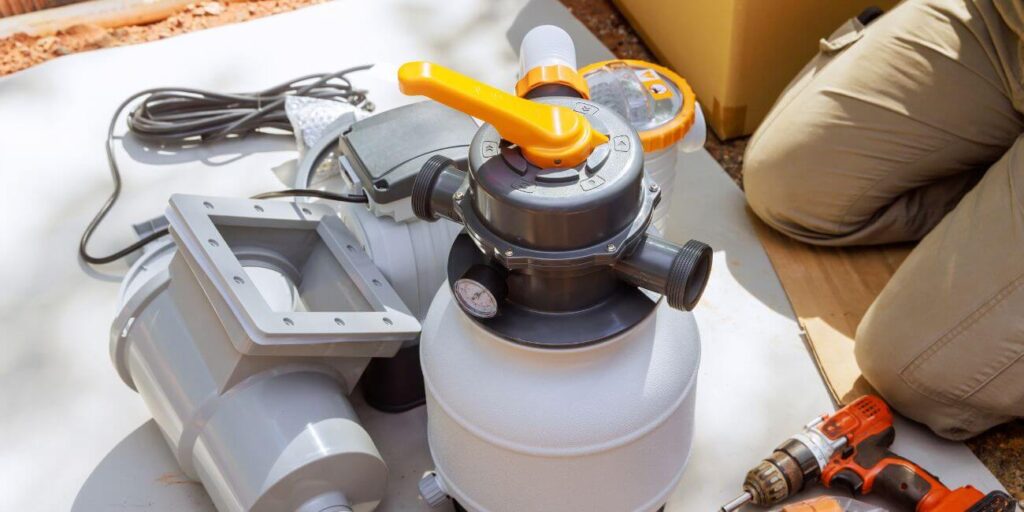
1. Bring into view all necessary instruments, equipment, and machinery.
Before starting, collect all the tools and supplies you’ll need:
- Pool filter sand (consult your filter manual for the type recommended by the manufacturer)
- New O-ring (optional, but highly recommended)
- Teflon tape and lubricant
- Unions, if you have to cut pipes to take them apart
Pro Tip: Keep small parts, such as the drain cap, aside in one safe place to avoid getting lost before the process is complete.
2. The pump should be off.
The pool pump should be turned off, but for added safety, the power at the circuit breaker should be turned off.
3. The tank should be carefully drained
Remove the drain cap from the bottom to relieve the tank’s pressure and allow it to drain some water. Consider a hose attachment to divert the water away from where you are working.
4. Carefully move ahead to remove the Multiport Valve from the installed position
Remove all hoses from the multiport valve, unscrew the clamp on the flange, and carefully lift the valve off the pipe. Be extremely careful not to damage the inside lateral assembly.
5. Remove the old sand
To block any sand from coming inside, tape off the pipe’s opening as best as possible. Take a small cup and start scooping out the old sand, or you may use a shop vacuum to take out the sand up to where you reach the bottom of the tank, where the lateral assembly is located.
6. Clean up the lateral assembly by checking it
Carefully lift the lateral assembly and check for any damage. Those laterals that are found to be cracked must be replaced. The ones found to have blockages should be put out to soak in a cleaning solution to add something that would dissolve all the residual LEFT.
7. Cleaning of the tank
Flush the tank with a garden hose, removing all sediment. Check the drain cap for damage and replace it as necessary. When adding new sand, fill the tank half full of water to pad the laterals.
8. Reassemble the lateral assembly
Carefully place the lateral assembly back into the tank, paying attention to correct lateral positioning and alignment.
9. Continue with adding a new layer of new sand
Mask the pipe so no sand enters, then slowly pour in your new pool filter sand. Fill the tank right to the top of the laterals at the sand level.
How-to Hint: Add sand carefully and avoid disturbing the laterals; misalignment could result in poor filtration.
10. O-rings should be carefully inspected for any damages
Check the multiport valve’s O-ring for wear and tear; replace it or apply a silicone-based lubricant to ensure the seal fits well.
11. Replace the multiport valve
Remove the tape from the pipe, shift the multiport valve, and secure it with the flange clamp. Reconnect the hose and tighten all the connections.
12. Start the backwash for the filter
After assembling, position the valve in the “Backwash” position and turn the pump on to bleed off fine sand particles. When the water is clear, go to “Rinse” and run the pump for another minute.
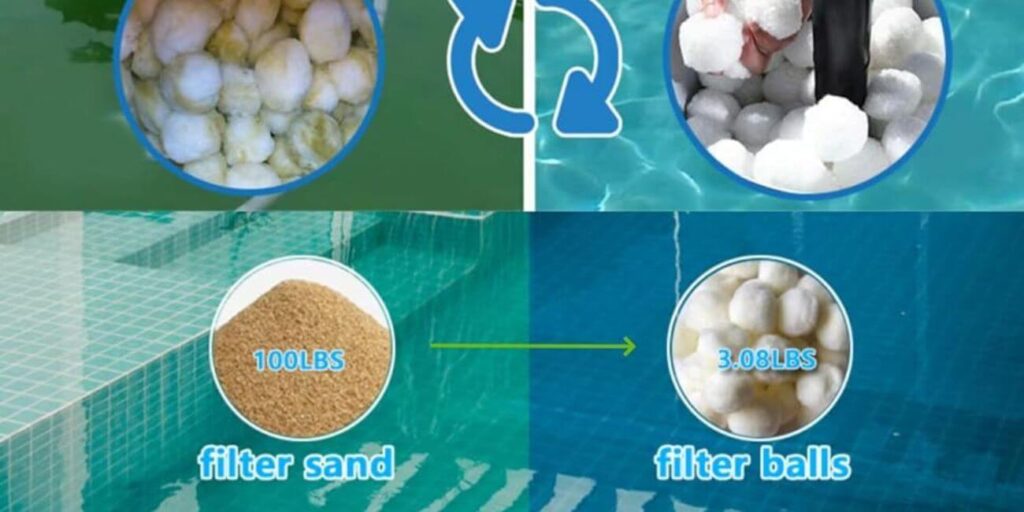
Pool Filter Balls vs Sand for Filtration Purposes
Pool filter balls are an advanced solution that replaces conventional sand filters. Recently, they have become trendy among owners due to their operational ease and better water filtration. These small and lightweight balls are typically made of polyester and many other fibrous materials that enhance their capability to filter much finer particles than regular sand.
Benefits of Using Pool Filter Balls
- Lightweight: A bag of such type is much easier to handle than a heavy sand-filled bag.
- Improved Filtration: While sand is only conventionally capable of trapping particles measuring between 20 to 40 microns in size, it traps particles with sizes as small as 5 microns.
- Lower Maintenance: Like sand, pool filter balls might also last five years, but backwashing is optional as often.
Disadvantages of Using Pool Filter Balls
- Compatibility: Not every pool filter can support the functionality of a filter ball, so the product’s manufacturer should ensure this.
- Higher Initial Cost: Filter balls are more expensive in the beginning stages than sand. This will dramatically increase the clarity of your pool water, especially in situations where fine particles may pass through or be poorly caught by traditional sand filters.
Last but not least, this system may not work with every type of pool setup, so take a little extra time to consider some pros and cons based on your filter type and your preference for maintenance.
You can learn more details by reading this article about Pool Filter Balls vs Sand.
Conclusion
Conclusively, cleaning your pool filter sand is one of the significant features that will keep your pool clean and transparent. Applying a step-by-step process will ease the task of replacing the sand in the filter and guarantee success. The filter balls for the pool: These are the newest options. They provide effective filtering with less maintenance required. But they may only fit some pool filters. Change the filtering sand from time to time, or use filter balls, and your pool will be well-groomed, bright, and performing at its best, with fewer chemicals and the right balance inside the pool.